Today I made the storyboard for my film opening. Here it is:
Saturday, February 27, 2021
Friday, February 26, 2021
Group Discussion (Day 9)
Today our class had been divided into groups. They were breakout rooms, so we could have been put up with anyone from the class. I ended up in a breakout room with David, Ella, Aurea, Tanish and Maria. We all individually talked about our projects: our initial plan, genre, blogs, and other things we had to do.
I really liked listening to their ideas because they are all very different but really well thought out. They gave me advice on editing softwares, and told me how some things would go. One thing we discussed about was the filter I want on my film opening. I am not familiar with editing things like this, but thankfully Maria and David told me some info about it. They indicated that I could use Adobe applications and other alternatives, and also let me know that to achieve this effect I want, I might have to select objects frame by frame. I also asked them whether my opening should have audio or just the music. They told me they think just the music with some sounds would be better than dialogue, which I agree on. Ella sugested that I would make the woman (Marylin) a really calm aspect, like the things she is doing is not a big deal, and that I should play the role; while David suggested that I inserted a scene where Marylin has a psychotic breakout. I enjoy getting different views and comments on my videos, it gives a lot of perspective and options to choose from. I also really liked how they pointed out they liked certain things on my plan I didn't give much attention to. Listening to their ideas opened my mind to doing other genres for next projects in life. I feel like it's safer to do things like dramas and comedies.
Wednesday, February 24, 2021
Story Outline (Day 8)
1. Setting
- Time- The 1950's, no specific year.
- Place/location- My house, kitchen, living room.
- Mood/Atmosphere- Pacific, calm.
- Point of View- Camera accompanies the woman's moves.
2. Characterization: Developing the characters of my story
- Wife (Marylin)
- Husband
3. Story
Tuesday, February 23, 2021
Sunday, February 21, 2021
Research On Production (Day 6)
Today I am going to research production for my video.
This is going to include set preparation, helpful camera settings, important tools, certain editing skills, etc.
Set Preparation
Lighting
Lighting can have a great impact on the look of a video production. It can make them look professional and polished, as well as amateur and low quality.- When lighting a face for a video, it is advised that the light is put at a 45 degree angle to a side. A bigger light is also appreciated- it doesn't have to be an extremely powerful one- but the bigger the surface area, the softer and the more even the image will be. Sunlight can be really good for filming, however, you should not film with direct light from the sun, because it can give out really harsh shadows.Having a mix of color temperatures could also be a risky move. When mixing the temperatures, the camera has to choose, and the outcome would be very unnatural.
- However, since I am filming scenes that are more dramatic, I will look for the elements that correspond to the mood and story of my video.- The harsher the shadows, the scarier a scene or person can look.-The less contrast in shadows, the more a person will look friendly and non- threatening.- "Harder light, harder experience"- You can direct a light to create more or less shadows, like for example when people tell stories in the dark- they put a lantern under their chin to look "scarier".
Lighting
DIY Lights
Editing
The reason I want only one color to show up (red) is that the time frame of my video is in the fifties, and television would only show in black and white. Red can represent anger or passion, and can help foreshadowing my plot by using a red element at the beginning.
Camera:
Sources:
Thursday, February 18, 2021
Research On Fake Blood (Day 5)
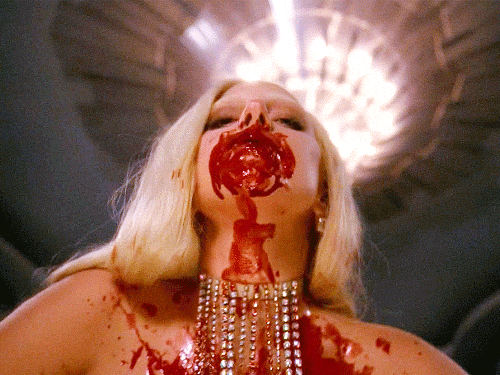
Hi Everyone! Today I have another really fun topic to do research on- making fake blood. I got this suggestion from my teacher (Ms. Stoklosa) because there are certain types of fake blood that create different effects.
Blood Types
Store-Bought blood is cheap and easy. However, it is harder to come off, and can have really bad or irritating ingredients. They also last shorter and actually smell quite terrible.
Scab blood is used for making fake wounds or scratches. It is quite thick also, so a little can go a long way.
Squirt blood is a bit different. It is water-based, so it's easier to remove. It is used to cover large areas, and it is perfect for making a person look like some blood exploded in front of their faces. However, it is not ideal to create actual wounds. Splatter blood is basically the same, and comes in a spray bottle to give it a more spread out effect.
Theatre/stage blood: Used specifically for active performances, so it can also be great for a video! It is safe to use around the mouth, and it doesn't dry.
Coagulated Blood: This one is perfect for deep, thick open wounds. It is very gooey and syrupy, and doesn't drip.
DIY Blood Recipes:
#1- Edible Fake Blood
- Red, Blue and Green Food Coloring (Stains!)
- Corn Syrup
#2- Bright Red Splatter Blood
-1/4 cup of water
- 4 drops of red food coloring
- spray bottle
#3- Dark, But Thin Blood For Spraying
- 1/4 cup water
-8 drops of red food coloring
-4 tbsp of corn syrup
2 drops yellow food coloring
1 drop green food coloring
#4- Realistic Thick Blood (Scab Blood)
- 2 tbsp Corn Syrup
- 4 drops od red food coloring
- 1 tsp cocoa mix
#5- Coagulated Blood
- 2 tbsp Corn Syrup
- 1/2 tsp dried onion flakes (to make it clumpy)
- 1/4 tsp water
- 6 drops red food coloring
- 1 tsp cocoa mix
#6- Thick Dripping Blood
- 2 tbsp corn syrup
- 2 drops red food coloring
- 1/4 tsp cocoa mix
SINCE those all have similar ingredients, I will let you guys know when I buy them or whenever I do one of these recipes.
Sources:
Wednesday, February 17, 2021
Research On The 1950's (Day 4)
Hi guys! I'm back again!
Today I have a very exciting topic to work on, which is nothing more nothing less than the 50's!
I love so many aspects of the 50's! (except for human rights stuff, that's completely different)
But anyways; here is my research on it!
The Fifties!
- A little history first
- Pop Culture
- Fashion
Women's
Men's
Hair
Women's
Now, let's talk about the hair. The hairstyles of women in the 1950's varied with their hair lengh. However, shorter hair was way more common and represented. Short hair was usually associated with the housewives; Medium for younger girls, and long for Hollywood pin ups.- The Italian Haircut:
- Soft Bob:
- Bouffant
- Short Bangs
- Pixie Cut
- Poodle Clip / Curly Bob (this is the one seen in the picture)
- Pony Tail
- Headbands & Scarves Hair Accessories
- Hair Flowers
- Hollywood Pin Up
- French Twist
- Chignon
Men's
- Middle Part Slick Back with Pencil Mustache
- Side Part Slick Back
- The Johnny Cash Pomp
- Forward Swept Gelled Hair
- Peter O'Toole Wavy Hair
- Gary Cooper Widow's Peak
- Gelled Hard Part with Contour
Women's Makeup
Sources:
CR
Couleur du Jour is a short film inspired by the idea of having “perfection” in society. It questions whether having a “perfect” li...
-
Couleur du Jour is a short film inspired by the idea of having “perfection” in society. It questions whether having a “perfect” li...
-
Hey guys!! I am done with Act II's storyboard!!! This is the OneDrive Link: https://browardcountyschools-my.sharepoint.com/:b:/g/perso...